Whenever some historical or statistical data needs to be displayed on a webpage, we take help of HTML tables. But now-a-days it has been common trend that every webmasters or bloggers keep an Export to CSV option besides the HTML tables, so that the visitors can easily save the data in their local drive for their future reference. Have you ever wonder, how do they keep that beautiful option besides every HTML tables ? Have you ever Google for that ? If you are a webmaster you might have searched for it at-least once in your life. Toady we will see how we can implement that for our personal blogs/websites.
Advantage of keeping an Export to CSV Option
- It definitely helps your visitors to save the data for their future reference
- They might do some other operations like plotting graph and charts, comparing and analyzing the data etc.
- They can print the table for their hard copy manual
- Email or transferring the data gets easier
- Last but not the least, your brand value increases
How to achieve this
I have seen many blogs and forums flooded with very similar questions-How to keep an export to CSV option for HTML tables. Believe it or not, every bloggers face this problem. Well, this can have many answers. The first and obvious answer is by writing a few lines of php codes will make your work done. The response will come from the server. But some people have also asked how to achieve this without dealing with server. My answer to this question is, you can never do this without dealing with server.
I know those who use Blogger platform or maintaining a static website are now in problem. Because they neither have any access on the server nor on the database. Some of them also have no idea about server coding and all. But wait…..I am writing this article to resolve the same issue. We have implemented a nice technique for our blog, first check it then we will proceed ahead.
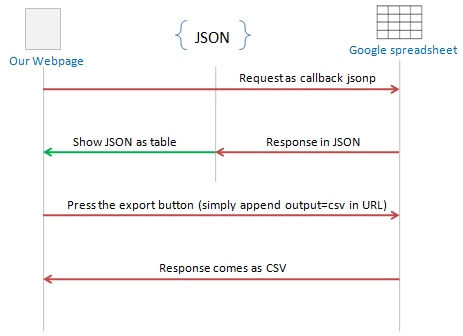
To do this you will need a Google account. The data of the HTML table will be kept in a Google spreadsheet. While displaying it on the webpage you can dynamically fetch the data from the spreadsheet with JavaScript. The same has been shown in the following diagram.
How it works
- Create a new Google Spreadsheet and provide your data
- Now share the spreadsheet as public on the web
- After sharing you will get an URL, simply append &output=csv at the end of the URL to export it into CSV
NOTE: In this article I have not described about displaying an HTML table dynamically by fetching the data from Google Spreadsheet. In my next article I will explain the same. For now, you can display a static table on your webpage and just provide a link to your spreadsheet with output=csv appended at the end to export it into CSV.
Live Demo: